Introduction
I'm Parth Yadav - a platform engineer with deep roots in cloud-native systems, distributed infrastructure, containers, and Kubernetes-based platforms. I design and build scalable cloud-native platforms that orchestrate clusters across environments - supporting bare-metal, edge, and hybrid cloud infrastructure.
I enjoy solving system-level problems, writing reliable controllers in Go, and contributing to tools that run at the intersection of infrastructure and software. Most of my work lives close to containers, control planes, and the on-prem cloud stack.
Checkout:
- Connect LXC VM to Docker Container Network
- Create VM from RHEL 9.6 Qcow2 Image on Ubuntu using libvirt
- LXD Quickstart notes
- Configure WakeOnLan on Ubuntu
- Automating Authentication in Postman
Connect an LXC VM to an Unmanaged Bridge Network on the Host
💡 LXC VMs Cannot Access Other Internal Bridge Networks on the Host
In many setups, you may want an LXC virtual machine (VM) to communicate with services running on the same host but on a different bridge network that is not managed by LXC—such as Docker’s default
docker0bridge. This is especially useful in hybrid environments where containers and VMs are used side by side for flexibility.However, by default, LXC VMs are attached to their own managed networks and cannot access these host-side bridges unless explicitly configured. As a result, the VM is unable to reach other network peers, such as Docker containers.
Let’s walk through a practical example to demonstrate this issue:
Understanding the problem statement:
Lets us start a LXC VM and run few ping tests:
$ lxc launch ubuntu-jammy node1
$
$ ping 8.8.8.8           # Internet: Works
$ ping 192.168.1.8       # Host: Works
$ ping 172.17.0.2        # Docker container: Fails
Observed output for the Docker container ping:
28 packets transmitted, 0 received, 100% packet loss
This confirms that while the VM has internet and host access, it cannot reach Docker containers running on the docker0 bridge.
Solution:
> Attach the LXC VM to the docker0 bridge
The docker0 bridge is unmanaged by LXC, meaning it was not created by LXC.
To enable connectivity between the LXC VM and Docker containers, we will add a second network interface to the VM and attach it to the docker0 bridge on the host:
# Create a new NIC device `eth1` and attach it to docker0 as parent.
$ lxc config device add node1 eth1 nic nictype=bridged parent=docker0
Verify new interface with lxc exec node1 ip a.
3: enp6s0: <BROADCAST,MULTICAST> mtu 1500 qdisc noop state DOWN group default qlen 1000
You’ll now see a new interface (e.g., enp6s0), but it is down and lacks an IP address:
> Next, Configure the New Interface
Assign a static IP address from Docker’s subnet (here we use 172.17.0.3) to the new interface:
$ docker network inspect bridge | grep Subnet
#   "Subnet": "172.17.0.0/16",

$ lxc exec node1 bash
node1$
node1$ ip addr add 172.17.0.3/16 dev enp6s0  # assign ip
node1$ ip link set enp6s0 up                 # bring up the interface
node1$
node1$ ip a show enp6s0
Expected output:
3: enp6s0: <BROADCAST,MULTICAST,UP,LOWER_UP> mtu 1500 state UP
    inet 172.17.0.3/16 scope global enp6s0
Verify:
$ ip r                    # New route for the Docker network
...
172.17.0.0/16 dev enp6s0 proto kernel scope link src 172.17.0.3


$ ping 172.17.0.2         # Docker container is reachable.

PING 172.17.0.2 (172.17.0.2) 56(84) bytes of data.
64 bytes from 172.17.0.2: icmp_seq=1 ttl=64 time=0.079 ms
^C
--- 172.17.0.2 ping statistics ---
1 packets transmitted, 1 received, 0% packet loss, time 0ms
rtt min/avg/max/mdev = 0.079/0.079/0.079/0.000 ms


$ curl 172.17.0.2:80      # curl Docker container running nginx.

64 bytes from 172.17.0.2: icmp_seq=1 ttl=64 time=0.397 ms
<html>
<head><title>Welcome to nginx!</title></head>
...
Conclusion
Our LXC VM is now successfully connected to the unmanaged host bridge and can communicate with services running inside Docker containers. This approach is ideal for hybrid environments where different virtualization technologies need to coexist on the same network.
To clean up, simply delete the LXC VM, it will cleanup all the network devices,
lxc delete node1
< Go to Home >
Create VM From RHEL 9.6 QCOW2 Image on Ubuntu
Below we will cover steps to create a Red Hat Enterprise Linux (RHEL) virtual machine on Ubuntu using a QCOW2 image.
Prerequisites
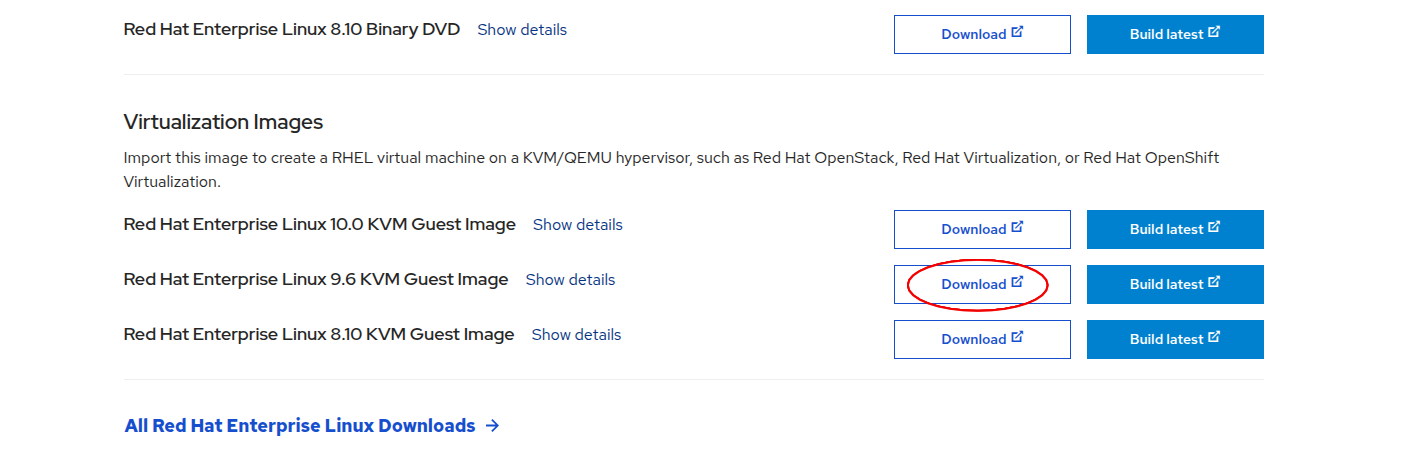
1. Download the RHEL QCOW2 Image:
Download the virtualization image for RHEL 9.* from the Red Hat Portal. It should be in .qcow2 format.
For this guide, we assume the downloaded file is named rhel9.qcow2.
💡 Tip: You can also create a custom image from the Red Hat portal. This allows you to embed your SSH key and subscription activation directly into the image. With a free Red Hat Developer Subscription, you're allowed to run up to 16 RHEL instances. You will have to signup first.
2. Install virt-manager if not present:
Ensure that virt-manager and virtualization tools are installed:
sudo apt-get update
sudo apt-get install virt-manager
Steps >>>
1. Clone the Base Image:
Create a copy of the downloaded QCOW2 image. This prevents modifying the original:
cp rhel9.qcow2 my-vm.qcow2
2. Create the Virtual Machine:
Use virt-install to create a VM from the QCOW2 image:
virt-install \
   --name my-vm \
   --noautoconsole \
   --import \
   --memory 2048 --vcpus=2 \
   --osinfo rhel9-unknown \
   --disk bus=virtio,path=my-vm.qcow2 \
   --network default \
#   --cloud-init user-data=user-data # Uncomment if using cloud-init
For custom built images, you can use username/password or ssh to access the vm.
💡 If you're not using a custom image with your ssh keys baked in it, then you'll need to pass an SSH key via
--cloud-initduring init to access the VM later. You can ssh into the vm usingssh cloud-user@<ip>.To get IP address of vm run:
virsh domifaddr --domain my-vm.💡 Here we have used
rhel9-unknownfor--osinfo. You can find what is suitable for your os usingvirt-install --osinfo list | grep rhel
3. Managing the Virtual Machine:
List running VMs:
virsh list
Connect to the VM Console:
virsh console my-vm
Shut Down the VM:
virsh shutdown my-vm
List All VMs (Including Stopped):
virsh list --all
4. Remove the VM and Disk:
virsh undefine --domain my-vm --remove-all-storage
⚠️ The
--remove-all-storageflag will deletemy-vm.qcow2. If you skip this, you can reuse the disk image to spin up the VM again from its last state.
Bonus
1. Register using Subscription-Manager
To register run:
subscription-manager register --username <username>.Verify using:
subscription-manager identity(it should show org ID).Later to unregister, run:
subscription-manager remove --all
subscription-manager unregister
subscription-manager clean
References:
< Go to Home >
LXD
Differences Between Docker and Linux Containers
Docker and Linux Containers (such as LXC) both use the same underlying Linux technologies i.e., chroot, cgroups, namespaces, etc. They differ in purpose: Docker focuses on lightweight application containers (typically for microservices), while Linux Containers is intended for full operating system containers.
Docker containers usually run a single process. In contrast, LXC containers behave more like virtual machines, offering a full OS environment.
Originally, Docker used LXC under the hood, but starting with version 0.9, it introduced its own runtime: libcontainer.
Docker emphasized application packaging, automation, and portability: leveraging Dockerfiles, layered filesystems, and compliance with the OCI standard. LXC, on the other hand, targets full system environments.
Linuxcontainers.org project provides LXD, a powerful tool for managing both Linux Containers and virtual machines, offering a CLI experience similar to Docker.
Personally, I prefer LXD for creating virtual machines in development due to its flexibility and Docker-like interface.
Commands
Below we will discuss commands for managing VMs. Same commands will apply for Linux Containers.
Initialization
Initialize LXD for first time use:
lxd init
Images & Remote Image Servers
List remote repository/servers available to pull images.
lxc remote list
List images from a particular remote repository
lxc image list REPOSITORY_NAME:
Search images using keyword MATCH from a remote repository
lxc image list REPOSITORY_NAME: MATCH
# lxc image list ubuntu-minimal:noble
Copy an image from remote repository.
lxc image copy REPOSITORY_NAME:IMAGE_ALIAS_OR_FINGERPRINT local: --alias ubuntu-focal
# lxc image copy ubuntu-minimal:52dd513b467a local: --alias ubuntu24
# lxc image copy ubuntu-minimal:ec0518e181c5 local: --alias ubuntu22
Now, List images locally
lxc image list
Delete a local image:
lxc image delete IMAGE_ALIAS_OR_FINGERPRINT
(Also checkout lxc image export and lxc image import)
Container & VM Management
List all containers/virtual machine
lxc list
Launch/run a virtual machine (use virtual machine image type)
lxc launch REPOSITORY_NAME:IMAGE_NAME VM_NAME
# lxc launch ubuntu24 myvm
Open shell in a virtual machine
lxc exec VM_NAME /bin/bash
# lxc exec myvm /bin/bash
Open console in a virtual machine
lxc console VM_NAME
Stop a virtual machine
lxc stop VM_NAME
Start a virtual machine
lxc start VM_NAME
Restart a virtual machine
lxc restart VM_NAME
Delete a virtual machine
lxc stop VM_NAME
lxc delete VM_NAME
Copy an instance to create a new instance.
lxc copy VM_NAME NEW_CONTAINER_COPY_NAME
Migrate or move an instance to different name/location
lxc move VM_NAME NEW_NAME
lxc move VM_NAME HOST:NEW_NAME
Configure VM/Containers
Set limit for memory of a container/virtual machine
lxc config set VM_NAME limits.memory 1GB
Set limit for cpu for a container/virtual machine
lxc config set VM_NAME limits.cpu 2
Set CPU Pinning for a container/virtual machine
lxc config set VM_NAME limits.cpu 2,3-5
Show all config for a container/virtual machine
lxc config show VM_NAME
Edit config for a container/virtual machine
lxc config edit VM_NAME
List devices attached to a container:
lxc config device list CONTAINER_NAME
Remove a device:
lxc config device remove CONTAINER_NAME DEVICE_NAME
Profiles
A profile contains config, storage volumes, network interfaces details. They are templates to spin-up new instances. They are alternative to manually modifing config for each instance. List profiles
lxc profile list
Get details of a profile
lxc profile show PROFILE_NAME
Copy a profile
lxc profile copy PROFILE_NAME NEW_PROFILE_NAME
Use profile to launch an instance launch/run a container/virtal machine
lxc launch REPOSITORY_NAME:IMAGE_NAME CONTAINER_NAME --profile PROFILE_NAME
Edit a profile
lxc profile edit PROFILE_NAME
Copying Files with Host
COPY a file from host to instance
lxc file push /path/to/file CONTAINER_NAME/target/path/for/file
COPY a file from instance to host
lxc file pull CONTAINER_NAME/path/to/file /new/path/on/host
Mount a directory from host to instance
lxc config device add CONTAINER_NAME NEW_DEVICE_NAME disk source=PATH_ON_HOST(/home/ubuntu) path=TARGET_PATH_IN_CONTAINER
LXD inside LXD
For running lxd inside lxd, make sure following settings are configured to the parent lxd instance
lxc config set CONTAINER security.priviledged true
lxc config set CONTAINER security.nesting true
Snapshots
Create a snapshot of a container
lxc snapshot CONTAINER_NAME NAME
Get details/status of a container; this also shows all snapshots that container has.
lxc info CONTAINER_NAME
Delete a snapshot of a container
lxc delete CONTAINER_NAME/SNAPSHOT_NAME
Restore a snapshot, i.e. rollback container to previous state
lxc restore CONTAINER_NAME SNAPSHOT_NAME
Network Management
List Networks
lxc network list
Show network details
lxc network show NETWORK_NAME
Create a new bridge network
lxc network create lxdbr1
Attach container/virtual machine to a network
lxc network attach NETWORK_NAME CONTAINER_NAME
Attach container/virtual machine from a network
lxc network detach NETWORK_NAME CONTAINER_NAME
DNS to ping between containers/virtual machines. Service discovery similar to docker and k8s:
lxc exec CONTAINER_1 -- ping CONTAINER_2_NAME.lxd
Storage Management
List storage pools:
lxc storage list
Show details of a storage pool:
lxc storage show POOL_NAME
Create a new storage pool:
lxc storage create POOL_NAME zfs size=10GB
Delete a storage pool:
lxc storage delete POOL_NAME
Cloud-init
Launch container/virtual machine with cloud-init
lxc launch IMAGE_NAME VM_NAME --config=user.user-data="$(cat my-cloud-init-data.yaml)"
Next, Verify cloud-init:
lxc exec VM_NAME bash

# 1. Check cloud-init status
$ cloud-init status --wait

# 2. Fetch cloud-init data
$ cloud-init query userdata

# 3. Validate cloud-init schema
$ cloud-init schema --system --annotate

# 4. Verify changes were applied
< Go to Home >
Configure Wake-on-LAN on Ubuntu
In this doc, we will configure & persist Wake-on-LAN on a Ubuntu machine using Netplan.
Wake-on-LAN (WoL) lets us remotely power on a machine/pc using a magic packet.
To enable WoL, first we need to check if our network interface supports Wake-on-LAN:
sudo ethtool <interface-name>

## Look for Output:
# ...
# Supports Wake-on: pumbg
# Wake-on: d
# ...
gin Supports means it supports magic packet WoL.Wake-on: dmeans WoL is currently disabled.
We can temporarily enable WoL using ethtool:
sudo ethtool -s <interface-name> wol g
But this will not presist over restart.
💡 We will also have to enable WoL in the BIOS/UEFI as well before OS can utilize it.
⚙️ Enable Persistent WoL via Netplan
Edit/Add your Netplan config:
sudo nano /etc/netplan/01-wol.yaml
network:
  version: 2
  ethernets:
    <interface-name>:
      wakeonlan: true
Replace
<interface-name>with actual interface name.
Then apply changes:
sudo netplan apply
This should presist WakeOnLan. We can verify again after reboot using command:
sudo ethtool enp3s0 | grep Wake-on
# Should return: "Wake-on: g"
Try Wake-on-Lan by sending a Magic Packet ✨
Now, let us shutdown the machine and try to boot it using WoL. Before shutdown copy the Mac address on the machine using ip a command.
Next, we can install wakeonlan utility to send our magic packet.
sudo apt install wakeonlan
Then send a magic packet to target machine on the same network:
wakeonlan <MAC-ADDRESS>
Make sure the target PC is connected to the same network and its BIOS/UEFI has WoL enabled.
< Go to Home >
Automating Authentication for Postman Requests/Collection
For this doc we will automate authentication(OAuth2 Password Grant) for all requests in a Postman Collection. This will:
Automatically obtain and refresh an OAuth2 access token using the Password Grant flow before each API request, ensuring a valid token is always used.
Uses Postman Concepts
- Pre-request Script: Runs automatically before every request in the collection (if set at collection level).
- Environment Variables: Store dynamic data like tokens, timestamps, URLs, credentials, and expiration times.
In script below we evaluate:
- Variable Nesting: Use
pm.variables.replaceIn()to resolve variables inside other variables (e.g.,Auth_Urlcontaining{{endpoint}}).
Environment Variables Used (set these in your Environment)
| Variable | Purpose | Example Value |
|---|---|---|
endpoint | Base URL and port of the auth server | 172.16.109.57:32701 |
Auth_Url | Full token URL, referencing {{endpoint}} | http://{{endpoint}}/auth/realms/cloud/protocol/openid-connect/token |
Client_Id | OAuth2 client ID | client_id |
Username | Username for password grant | parth2@coredge.io |
Password | Password for password grant | admin |
OAuth_Token | Stores current access token | (set dynamically by script) |
OAuth_Timestamp | Timestamp of when token was obtained | (set dynamically by script) |
ExpiresInTime | Token validity duration in milliseconds | (set dynamically or default 300000 ms = 5 min) |
How the below Pre-request Script Works
-
Check for valid token: Compares current time with
OAuth_TimestampplusExpiresInTime. If token is valid and present, skips refresh. -
Resolve nested variables: Uses
pm.variables.replaceIn()to replace{{endpoint}}inAuth_Url. -
Make token request: Sends a POST request to the OAuth2 token endpoint using password grant. Sends URL-encoded form data:
grant_type,client_id,username,password, optionallyscope. -
Handle response: On success, saves new access token and timestamp. Updates
ExpiresInTimebased on token expiry from the response. -
Logs: Helpful console messages for debugging token refresh status.
Copy the script to your postman Collection:
// Default expiration time to 5 minutes (in ms)
const DEFAULT_EXPIRES_IN = 300000;

// Retrieve token timestamp and expiration time from environment
const expiresInTime = Number(pm.environment.get("ExpiresInTime")) || DEFAULT_EXPIRES_IN;
const tokenTimestamp = Date.parse(pm.environment.get("OAuth_Timestamp") || 0);

// Check if token is expired or missing
if ((new Date() - tokenTimestamp) < expiresInTime && pm.environment.get("OAuth_Token")) {
    // Token is still valid; no need to refresh
    console.log("Access token still valid, skipping refresh.");
    return;
}

console.log("Access token expired or missing, requesting a new token...");

// Resolve Auth URL with nested {{endpoint}} variable
const rawAuthUrl = pm.environment.get("Auth_Url");
const authUrl = pm.variables.replaceIn(rawAuthUrl);

// Prepare OAuth request payload
const clientId = pm.environment.get("Client_Id");
const username = pm.environment.get("Username");
const password = pm.environment.get("Password");
const scope = pm.environment.get("Scope") || "";

pm.sendRequest({
    url: authUrl,
    method: "POST",
    header: {
        "Content-Type": "application/x-www-form-urlencoded"
    },
    body: {
        mode: "urlencoded",
        urlencoded: [
            { key: "grant_type", value: "password" },
            { key: "client_id", value: clientId },
            { key: "username", value: username },
            { key: "password", value: password },
            // Only include scope if it's set
            ...(scope ? [{ key: "scope", value: scope }] : [])
        ]
    }
}, function (err, res) {
    if (err) {
        console.error("Error while fetching access token:", err);
        return;
    }

    if (res.code !== 200) {
        console.error(`Token request failed with status ${res.code}:`, res.text());
        return;
    }

    const json = res.json();
    pm.environment.set("OAuth_Token", json.access_token);
    pm.environment.set("OAuth_Timestamp", new Date());

    if (json.expires_in) {
        pm.environment.set("ExpiresInTime", json.expires_in * 1000);
    }

    console.log("New access token obtained and saved.");
});
Final: Using the above setup with Requests
Here’s a step-by-step guide to set up collection-level Authorization in Postman using {{OAuth_Token}} we create in above script:
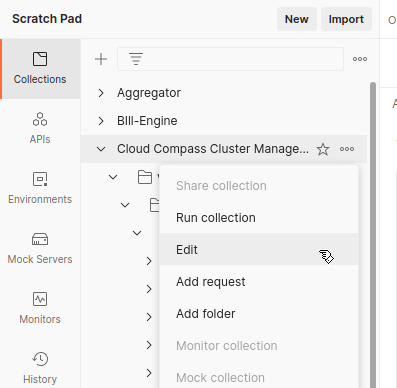
Step 1: Open your Collection settings
- In Postman sidebar, find your collection.
- Click the three dots (•••) next to the collection name.
- Select Edit.
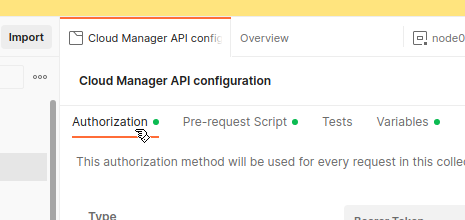
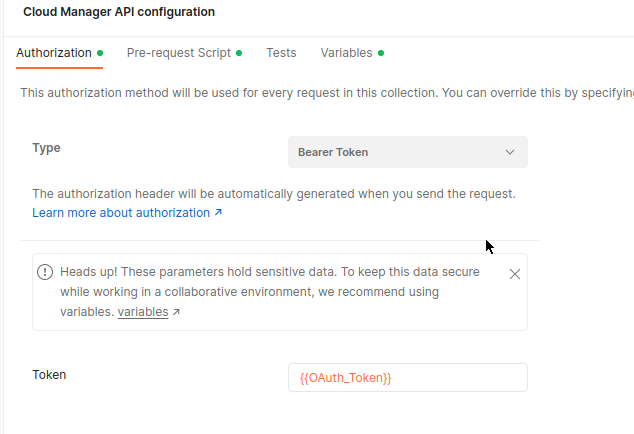
Step 2: Go to the Authorization tab
- In the Edit Collection modal, click the Authorization tab.
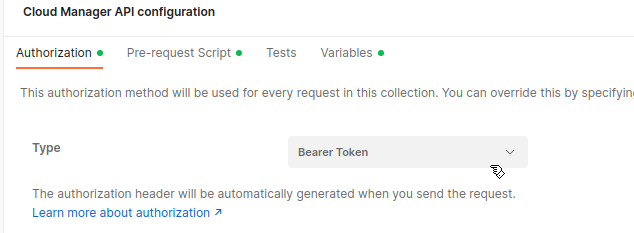
Step 3: Set Type to Bearer Token
- Click the Type dropdown.
- Select Bearer Token.
Step 4: Enter {{OAuth_Token}} as Token value
- In the Token field, enter:
{{OAuth_Token}}
Step 5: Save your changes
- Click Save at the bottom right of the modal.
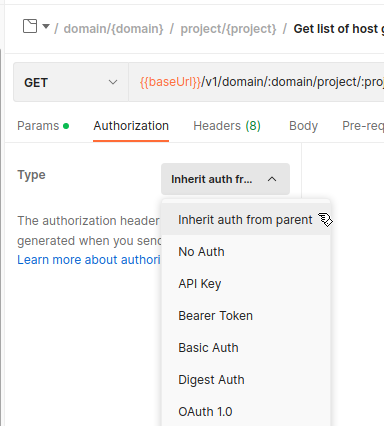
Step 6: Verify requests inherit Authorization
- Open any request in the collection.
- Go to its Authorization tab.
- It should show Inherit auth from parent.
Done!
Now every request in your collection will send the header:
Authorization: Bearer <your-current-OAuth-token-from-environment>
and your pre-request script ensures {{OAuth_Token}} is always fresh.
References: